How to Build a Complete Computer Vision Project
(Not Just Train a Model)
By Dr. Ali Khan | Occulins
September 17, 2026
Most people who learn computer vision learn it through tutorials. Tutorials teach you how to train a model. They show you the dataset loading, the training loop, the validation metrics, and the final prediction visualisation. They are excellent at what they teach.
What they do not teach is what comes before the dataset loading and what comes after the final prediction. Those two gaps, the work upstream of training and the work downstream of it, are where most real CV projects succeed or fail. And because tutorials skip them, most practitioners arrive at their first real project without knowing those gaps exist.
This post is about closing them. Not by going deep on any individual technique, the rest of this blog series covers the technical details, but by giving you the complete map of what a CV project actually involves and what the connections between the stages look like.
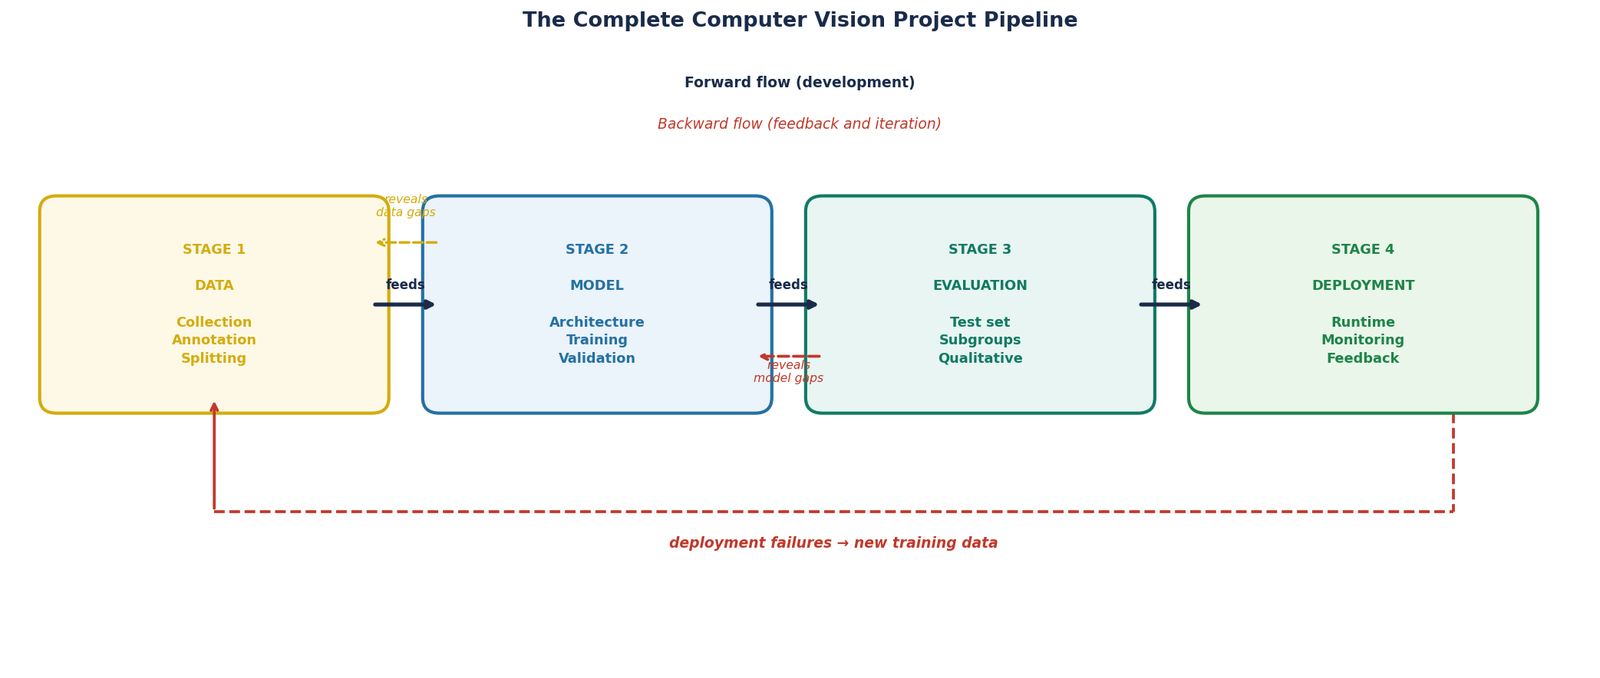
Figure 1 — The complete computer vision project pipeline, four stages connected by dependencies that flow in both directions. A decision made in the data stage constrains what is possible in the model stage. A failure discovered in the evaluation stage requires revisiting the data stage. The pipeline is not linear, it is iterative.
Data is where projects are won or lost before a single line of training code is written. This is not a motivational statement, it is a practical observation about what constrains every subsequent decision.
The model you can train is constrained by your data. The evaluation you can trust is constrained by how you split your data. The deployment performance you can achieve is constrained by how well your data represents the deployment environment. Every stage downstream of data inherits its limitations.
What Data Work Actually Involves
Data work is not just downloading a dataset and running a script. For a real project it involves decisions that have no single correct answer and that materially affect what is achievable.
None of these questions are answered by collecting images and labelling them. They require deliberate decisions before collection begins, during collection, and again when the first model results arrive and reveal gaps in the data.
The Data Audit Before Training
Before training any model on a new dataset, run a data audit. This takes less than an hour and prevents the majority of data-related training failures. It involves four checks:
- Class distribution: count instances per class. If any class has fewer than 100 training examples, flag it before training not after the model fails on it.
- Annotation consistency: visually inspect 50 random labelled examples. If annotators have applied different standards to the same class, the model will learn the inconsistency.
- Split independence: verify that your validation set is genuinely independent of training such as different sources, different time periods, or at minimum different sequences for video-derived data.
- Coverage: check that the data represents the conditions you expect at deployment, for instance lighting, resolution, angle, occlusion, scale. Gaps in coverage become gaps in model performance.
Model training is what tutorials cover comprehensively. Architecture selection, loss functions, optimiser choice, learning rate scheduling, augmentation, all of this is well documented and well understood. There are good defaults, good libraries, and good documentation. This is the part of the pipeline where most practitioners are most comfortable.
What tutorials do not cover is the model selection decision that comes before training and the model validation decision that comes after it.
The Decision Before Training: Architecture and Scale
Choosing your model architecture should be driven by your deployment constraints, not by what achieved the highest benchmark score last month. A model that achieves state-of-the-art mAP but cannot run within your latency budget on your deployment hardware is not a viable choice, regardless of its benchmark position.
The right questions before choosing an architecture are: what is my latency budget, what hardware will this run on, what is the minimum accuracy I need, and what is the maximum model size that fits in the available memory. These constraints typically eliminate most architecture options before you train a single epoch.
For most practical detection and segmentation projects, starting with the smallest model that is plausibly capable — YOLO nano for detection, a lightweight U-Net variant for segmentation — and scaling up only when the baseline fails to meet requirements is consistently more efficient than starting with the largest capable model and optimising down.
The Decision After Training: Is This Model Ready?
A model that finished training is not the same as a model that is ready for the next stage. Before moving from model training to evaluation, answer these questions:
- Have the training and validation loss curves converged to a stable state?
- Is the best checkpoint saved based on validation metric, not final epoch?
- Have you inspected predictions visually on a representative sample of validation images?
- Are there obvious systematic failure patterns in the visual predictions that aggregate metrics might conceal?
Evaluation is where the gap between "the model works" and "the model works for my task" becomes measurable. Done well, evaluation tells you exactly where the model succeeds, where it fails, and whether the failures are acceptable for your application. Done poorly, evaluation produces numbers that look fine and hide failures that will surface at deployment.
What Complete Evaluation Involves
Complete evaluation is not running the validation script and reporting the headline metric. It is a structured process with four components:
Quantitative evaluation on the held-out test set. Not the validation set used during training, a genuinely held-out test set that the model has never seen and that was not used to make any training decisions. The validation set has been implicitly used to select the best checkpoint and tune any training decisions, which makes it unsuitable as an unbiased performance estimate.
Per-class and per-subgroup analysis. Aggregate metrics hide per-class failures. For every evaluation, read the per-class numbers, not just the mean. Additionally, stratify by subgroups that matter for your application: object size, occlusion level, image quality, acquisition source. Subgroup analysis reveals the distribution of performance that aggregate metrics conceal.
Qualitative review. Show a random sample of predictions, including the model's most confident errors, to someone with domain knowledge. This consistently surfaces failure modes that quantitative metrics do not capture. An hour of qualitative review with a domain expert is worth days of metric analysis.
Deployment-condition evaluation. Evaluate on data that resembles your actual deployment environment as closely as possible. If you cannot evaluate on real deployment data before launch, evaluate on the closest available approximation and document the gap explicitly.
Deployment is where a trained model becomes a functioning system. The previous post in this series covered deployment in detail the environment change, the latency trade-off, model format decisions, and the five questions you must answer before deploying. Rather than repeating that content, this section focuses on where deployment fits in the complete pipeline and what the connections back to earlier stages look like.
Deployment Is Not the End
The most important thing to understand about deployment is that it is not the end of the project, it is the beginning of a new feedback loop. A deployed model encounters the real world, and the real world is more diverse than any dataset. Performance will drift. Edge cases will appear that were not in the training data. The model's behaviour will need to be monitored, and eventually, the model will need to be updated.
Building for this reality means treating deployment as the beginning of an operational phase rather than the end of a development phase. The data you collect from real-world deployment is the most valuable data you have for the next training iteration, because it represents the actual distribution the model will encounter.
The Feedback Loop Back to Data
Every deployment failure is a data signal. When the model fails on a type of image it has not seen before, that failure identifies a gap in the training data. Collecting and labelling examples of that failure type, adding them to the training set, and retraining closes the gap for the next model version.
Projects that build this feedback loop explicitly, collecting deployment failures, triaging them, incorporating them into the next training cycle, improve continuously over time. Projects that treat deployment as final produce models that are frozen at their initial capability and degrade relative to the real-world distribution as it evolves.
The Connections Between Stages
The four-stage pipeline is not a one-way sequence. Each stage has dependencies on the others that flow in both directions, and the connections between stages are where most project failures actually originate.
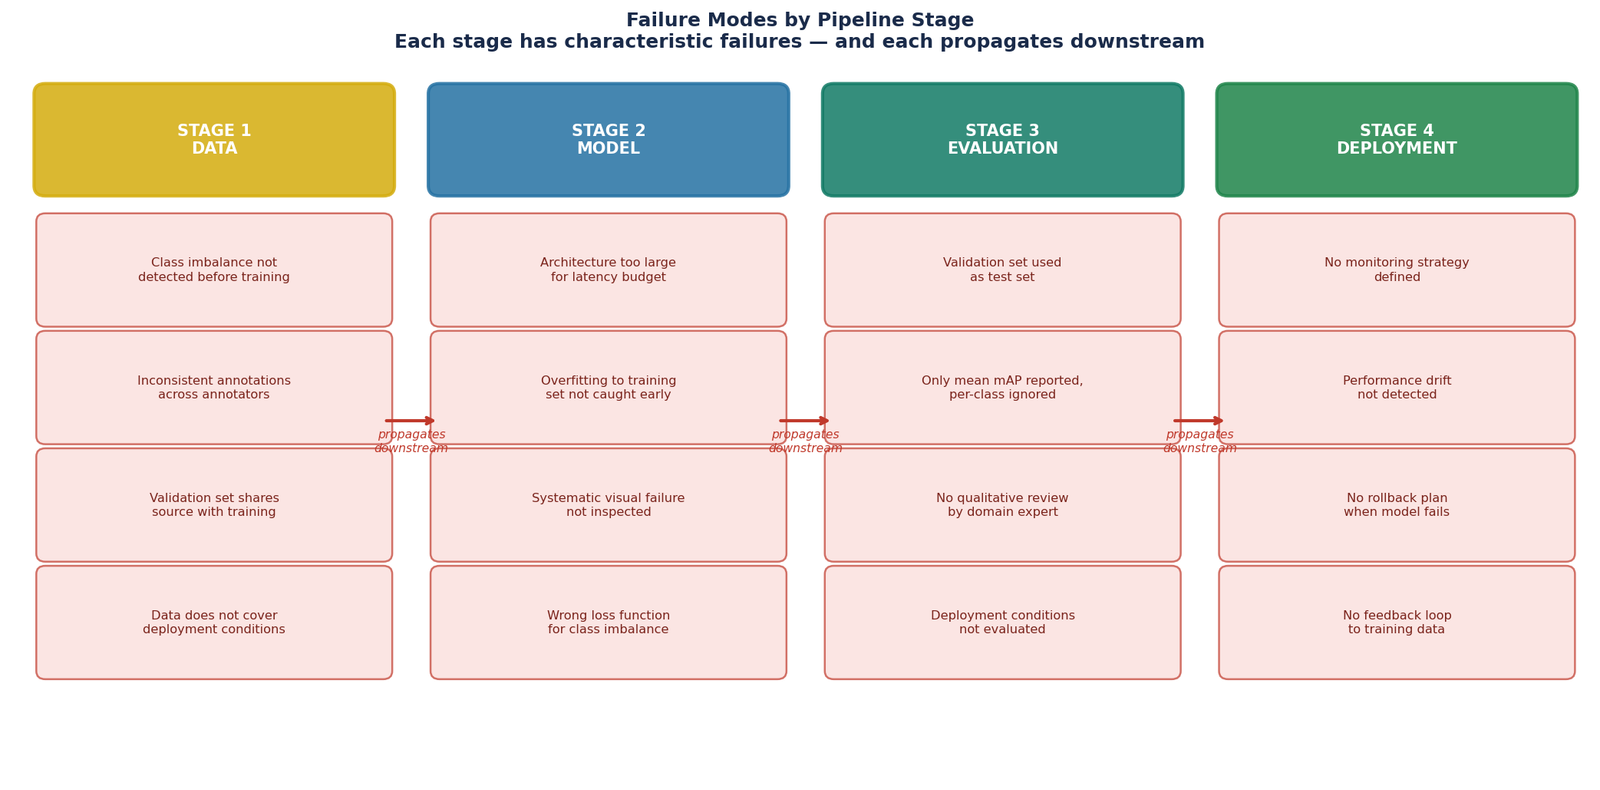
Figure 2 — Failure modes mapped to pipeline stages. Each stage has characteristic failure modes and each failure propagates to later stages. A data failure affects model, evaluation, and deployment. A model failure affects evaluation and deployment. An evaluation failure affects deployment. Understanding which stage a failure originated in determines where the fix must be applied.
Data determines what model is possible. A dataset with severe class imbalance cannot produce a model with balanced per-class performance without addressing the imbalance in the data, no training technique fully compensates for a fundamental data distribution problem. A dataset that does not represent the deployment environment cannot produce a model that generalises to it.
Model training reveals data problems. When a model fails on a class despite reasonable training, the failure is often in the data, including insufficient examples, inconsistent annotations, or class definitions that are too ambiguous for the model to learn. Training is the process that makes data problems visible.
Evaluation reveals model problems. Per-class evaluation, subgroup analysis, and qualitative review surface failure modes that training metrics do not. A complete evaluation is not the end of the model stage, it is the diagnostic that tells you whether the model stage is actually finished.
Deployment reveals evaluation gaps. When a deployed model fails in ways that evaluation did not predict, the evaluation was incomplete, it did not cover the conditions where the failure occurs. Every deployment failure is evidence of an evaluation gap that should be closed before the next model version is deployed.
The Notebook Approach vs the Professional Approach
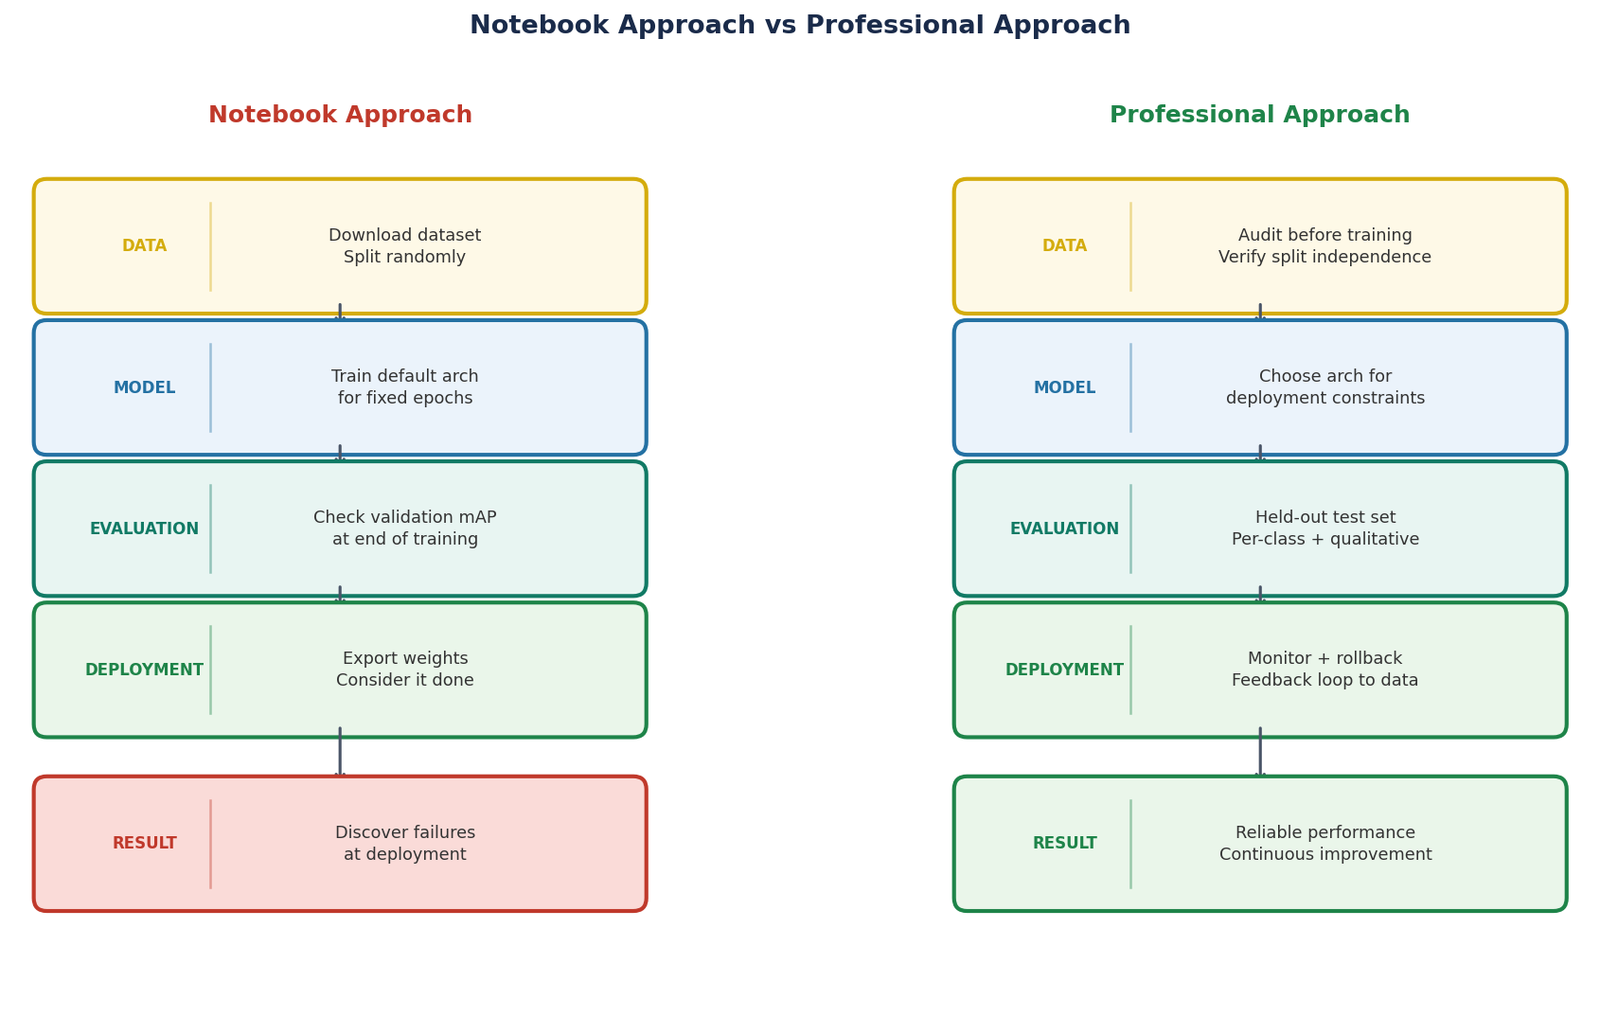
Figure 3 — The notebook approach versus the professional approach at each pipeline stage. The notebook approach is not wrong, it is the natural starting point for learning. The professional approach extends it with the decisions, validations, and feedback loops that make a project reliable rather than just functional.
Notebook Approach
- Download dataset, split randomly
- Train default architecture for fixed epochs
- Check validation mAP at the end
- Export model weights
- Consider project complete
- Discover failures at deployment
- Retrain from scratch when things break
Professional Approach
- Audit data before training begins
- Choose architecture based on deployment constraints
- Monitor training, inspect predictions during training
- Evaluate on held-out test set with per-class and subgroup analysis
- Qualitative review with domain expert
- Deploy with monitoring and rollback plan
- Build feedback loop from deployment failures to data
The notebook approach is not wrong, it is how most people learn, and it is the right starting point for exploration and experimentation. The problem is not the notebook approach itself but treating it as sufficient for a project that needs to work reliably in the real world.
The professional approach is not more complicated in terms of individual steps. It is more disciplined, it makes explicit decisions at each stage rather than accepting defaults, and it builds connections between stages rather than treating them as independent. That discipline is what separates a model that is trained from a system that works.
Where to Start
If you are building a CV project right now, the most valuable thing you can do at each stage is answer the key question for that stage before moving to the next one.
| Stage | Key question to answer before moving on |
|---|---|
| Data | Does my data represent the conditions my model will encounter at deployment? |
| Model | Does my architecture fit within my deployment constraints, and have I inspected predictions visually? |
| Evaluation | Have I evaluated on a genuinely held-out test set with per-class breakdown and qualitative review? |
| Deployment | Do I have a monitoring strategy and a defined process for incorporating deployment failures into the next training cycle? |
These questions do not have short answers. Answering them properly takes time and requires domain knowledge about your specific application. That is exactly the point, the answers cannot be looked up in documentation or copied from a tutorial, because they depend on your specific data, your specific hardware, your specific performance requirements, and your specific tolerance for failure.
Selected implementations, supporting utilities, and companion resources related to this article are available through the Blog 11 Companion Resources page .
Companion Resources Included
- Pre-training data audit checklist
- Model readiness checklist
- Stage-by-stage key questions reference
Building a complete CV project involves decisions at every stage that depend on your specific data, constraints, and application.
Data collection strategy, architecture selection for your hardware, evaluation design for your use case, deployment monitoring for your operational environment, these are not decisions with universal answers. They require experience with similar problems and judgment about which trade-offs matter most for your specific situation.
If you are working through any stage of this pipeline and running into decisions that are harder than expected, feel free to reach out through Occulins Contact